
The Authoring App is used to :
- create question banks;
- add questions to question banks;
- create test documents;
- insert questions from the question banks into test documents.
The following sections explain each of these processes.
Creating a New Question Bank
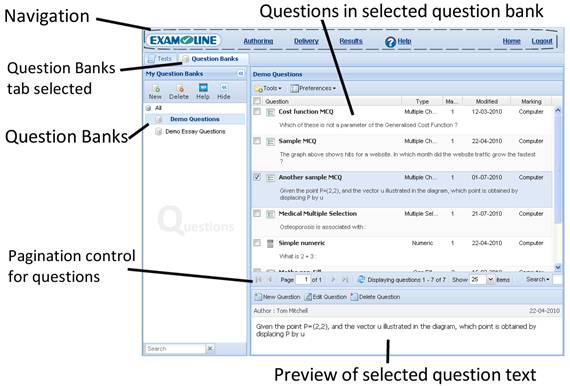
The first step in authoring is to create a question bank. In the authoring app, make sure the Question Banks tab is selected, as shown below.
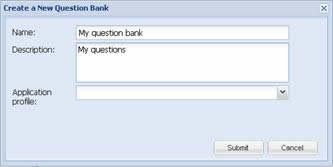
Click on the New button in the question bank tab (underneath where it say My Question Banks), give your new question bank a name and description in the dialog which appears (see image below), and click Submit.
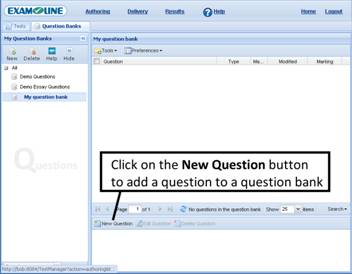
Your new question bank is added to the list of question banks, and automatically selected. Initially of course it contains no questions.
Creating Questions
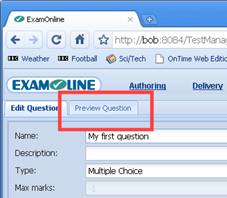
To add a question to the bank, click on the New Question button.
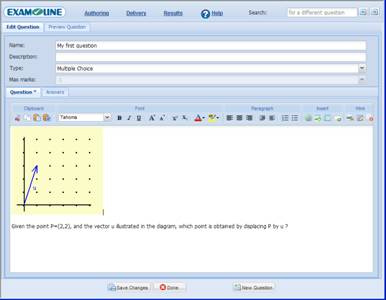
This will open the question editor, shown below.
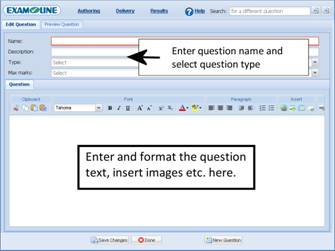
Enter a name for your question, and select a question type. Depending on the question type, you may also have to select a value for Max marks (if you select Multiple Choice you will not, since the value for Max marks is calculated automatically from the marks you set for the individual answers).
Entering the Question Text
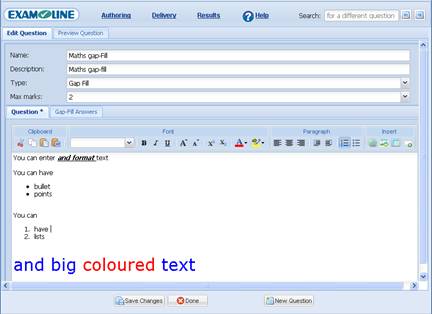
No matter what question type you choose, you must enter the text of the question (and image(s) if required) in the HTML Editor in the Question tab. The HTML editor has a similar look and feel to a word processor.
![]() Tip : Depending on the browser you use, you may find that when you create a new question, the HTML editor contains a leading space. Click in the HTML editor and then hit the backspace key to delete the space before you begin typing the text of your question. This may seem like an unnecessary ‘feature’ (it does to us) but it’s something we currently have to live with in order to provide broad cross browser compatibility for ExamOnline.
Tip : Depending on the browser you use, you may find that when you create a new question, the HTML editor contains a leading space. Click in the HTML editor and then hit the backspace key to delete the space before you begin typing the text of your question. This may seem like an unnecessary ‘feature’ (it does to us) but it’s something we currently have to live with in order to provide broad cross browser compatibility for ExamOnline.
Adding Images to Questions
To add an image to a question, insert the cursor where you want the image to go in the question text, and click on the ![]() Insert Image button on the HTML Editor toolbar. In the dialog which appears, click on the
Insert Image button on the HTML Editor toolbar. In the dialog which appears, click on the ![]() icon next to the Source field, and the image browser will appear as shown below.
icon next to the Source field, and the image browser will appear as shown below.
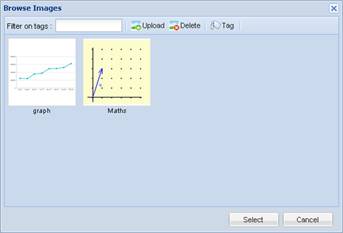
Image Browser
From here you may select any images you have previously used in ExamOnline, or Upload a new image from your computer to use. You may also tag images with keywords, which can make it easy to search your images (by entering text into the Filter on tags field). Once uploaded, click on the image you want to insert, and click on the Select button. You may then choose to enter a title or description for the image, or to change the size of the image. Click on the insert button when you are done.
![]() Tip :You can view and edit the HTML source for the question by clicking on the
Tip :You can view and edit the HTML source for the question by clicking on the ![]() Source Edit button on the HTML editor toolbar. However this is only recommended for the experienced HTML coder who wants to fine tune the formatting of a question. You can also completely clear the question text / images etc for a question by clicking on the
Source Edit button on the HTML editor toolbar. However this is only recommended for the experienced HTML coder who wants to fine tune the formatting of a question. You can also completely clear the question text / images etc for a question by clicking on the ![]() Clear button on the HTML editor toolbar.
Clear button on the HTML editor toolbar.
Positioning Answer Boxes in Questions
For some question types (e.g. gap-fill, numeric) an answer box will be displayed for the candidate to enter their answer. By default, ExamOnline will automatically add an answer box to the question and position it underneath the question text. For example :
However you may also choose where to position the answer box by inserting the cursor at the appropriate position in the question text, and clicking on the ![]() Insert Answer Box button in the HTML editor toolbar. You will need to specify the width of the box to insert (in characters), and the box will be inserted into the question text. The question will then be rendered with the box at the position and with the width you specified. For example :
Insert Answer Box button in the HTML editor toolbar. You will need to specify the width of the box to insert (in characters), and the box will be inserted into the question text. The question will then be rendered with the box at the position and with the width you specified. For example :
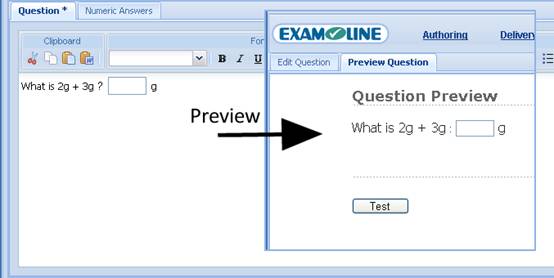
Previewing a Question
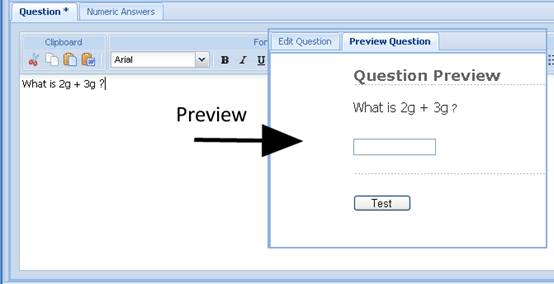
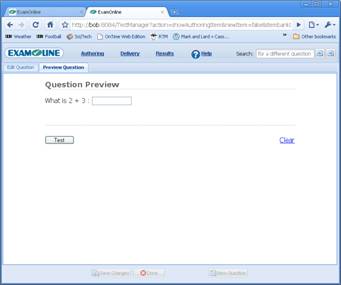
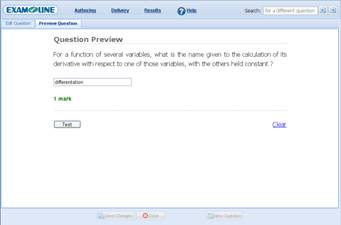
When you are ready, you may preview your question by clicking on the Preview Question tab.
This shows the question exactly as it will appear to the candidate during a test. If the question is an automatically marked question, you may also test the marking from the preview tab. However you will need to specify the answers before you can test the marking. How to do this for the different question types is covered in the following sections.
Creating a Multiple Choice Question
When you select the multiple choice question type, an Answers tab will automatically be added to the question editor interface.
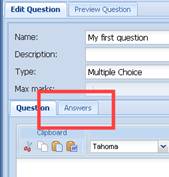
Click on the Answers tab to enter the answers for the question, as shown below.
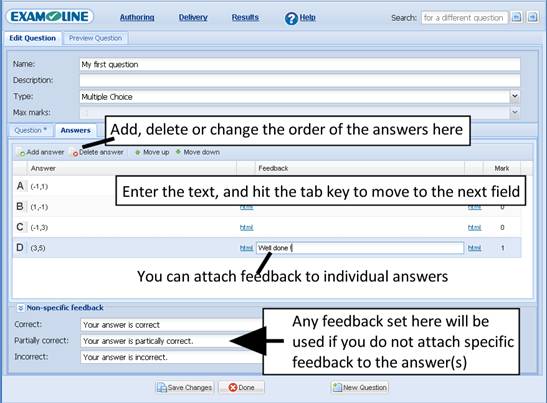
Authoring a Question
Click on the Add answer button in the toolbar, and enter the text for the answer. Hit the tab key to move on to the next field. You may attach specific feedback to individual answers, and /or you may set non-specific feedback (i.e. feedback which will be used if no feedback has been attached to an individual answer). Feedback is only relevant when tests are delivered formatively, or when candidates are permitted to see their results at the end of a test. You may include HTML (e.g. images) in either the answers or the feedback by clicking on the htmllinks.
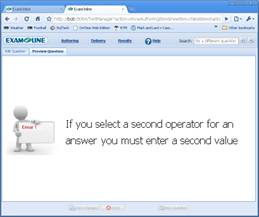
You may preview and test your question by clicking on the Preview tab (next to the Edit Question tab near the top left of the screen). If there are errors in the way you have created the answers, you will receive an error message. For example :
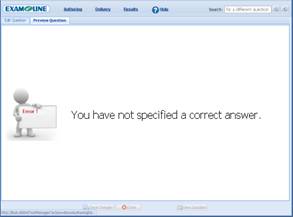
If this happens, click the Edit Question tab, return to the Answers tab, correct the error, and then click on thePreview tab again. You may test that the question performs as you intended by selecting an answer, and clicking on the Test button when in the preview tab.
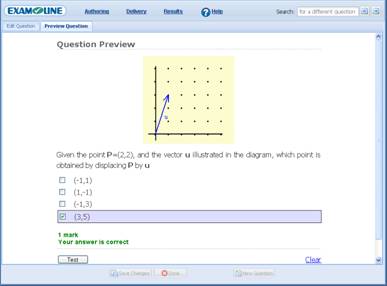
Question Preview
When you have finished the question, click on the Save Changes button at the bottom of the page. You may start on a new question by clicking the New Question button, or return to the question banks page by clicking on the Done button.
Creating a Multiple Selection Question
The process for creating a multiple selection question is the same as for creating a multiple choice question, except that you need to specify more than one correct answer, and additional options are available when setting up the answers. These options differ slightly depending on how you wish the question to function. This is demonstrated by example.
Example 1
To configure a question such as :
Which 3 are prime numbers :
- 2
- 11
- 33
- 47
- 53
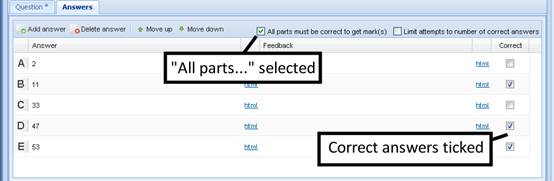
where the question is for 3 marks, and all 3 marks are awarded if and only if the candidate selects the 3 correct answers, set Max marks to 3 and configure the answers options as follows:
Example 2
To configure a question such as :
Which 3 of these are prime numbers :
- 2
- 11
- 33
- 47
- 53
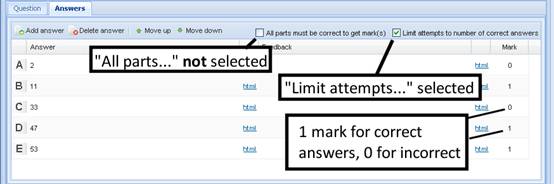
where the question is for a maximum of 3 marks, but candidates may get fewer marks if they only select 1 or 2 of the correct answers, and you want to limit the candidate to selecting a maximum of three answers,configure the answers options as follows :
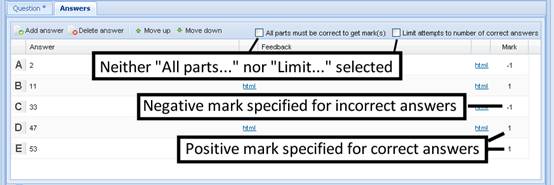
Example 3
To configure a question such as :
Which of these are prime numbers :
- 2
- 11
- 33
- 47
- 53
Where the question is for a maximum of 3 marks, but candidates may get fewer marks if they only select 1 or 2 of the correct answers, and should be penalised if they choose an incorrect answer, set Max marks to 3 and :
You may try out the effect of mixing the multiple selection options for your question by setting options and then testing the question in the Preview Question tab.
Creating a Numeric Question
See also : Positioning Answer Boxes in Questions
When you select the numeric type, a Numeric Answers tab will automatically be added to the question editor interface.
Click on the Answers tab to enter the answers for the question, as shown below.
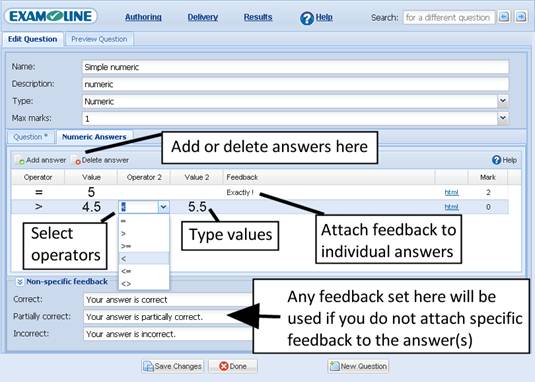
Click on the Add answer button in the toolbar, and select the operator(s) and values (see above) for the answer. Hit the tab key to move on to the next field. You may attach specific feedback to individual answers, and /or you may set non-specific feedback (i.e. feedback which will be used if no feedback has been attached to an individual answer). Feedback is only relevant when tests are delivered formatively, or when candidates are permitted to see their results at the end of a test. You may include HTML (e.g. images) in either the answers or the feedback by clicking on the html links.
With numeric answers, you can specify simple answers (e.g. the answer must be 5) or more complex ranges (e.g.the answer must be between 1 and 2). For each answer you must specify the marks to be awarded when a candidate response matches it. In this way, for example, you may set up a question to give 1 mark for answers between 4.5 and 5.5, but 2 marks for if the answer is exactly equal to 5.
Note that the system will apply the answers in the order you list them, and will stop marking when an answer is matched. You should therefore specify the highest mark answers first (i.e. the ‘exactly equal to 5’ answer in the example just quoted).
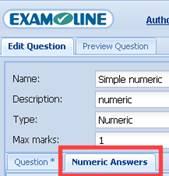
Example 1
How to set up a question to give one mark to candidates who give the answer : 5

Example 2
How to set up a question to give one mark to candidates who give a numeric answerbetween 1 and 2 inclusive.

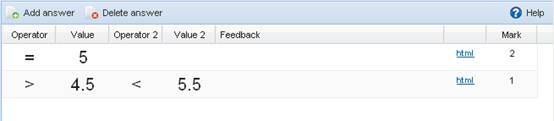
Example 3
How to set up a question to give two marks to candidates who answer 5, but only one mark to candidates who give a numeric answer between 4.5 and 5.5 exclusive.
You may preview and test your question by clicking on the Preview Question tab (next to the Edit Questiontab near the top left of the screen). If there are errors in the way you have created the answers, you will receive an error message. For example :
If this happens, click the Edit Question tab, return to the Answers tab, correct the error, and then click on thePreview Question tab again. You may test that the question performs as you intended by entering an answer, and clicking on the Test button when in the Preview tab.
When you have finished the question, click on the Save Changes button at the bottom of the page. You may start on a new question by clicking the New Question button, or return to the question banks page by clicking on the Done button.
Creating a GapFill Question
See also : Positioning Answer Boxes in Questions
When you select the gap-fill type, a Gap-Fill Answers tab will automatically be added to the question editor interface.
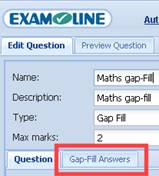
Click on the Gap-Fill Answers tab to enter the answers for the question, as shown below.
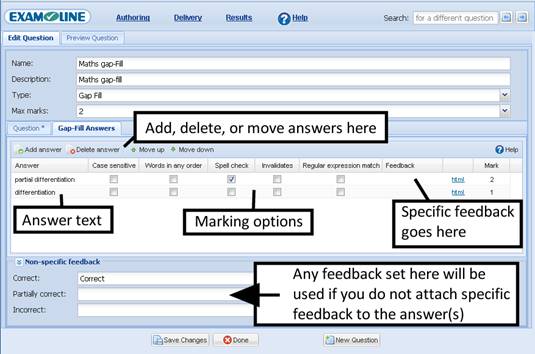
Click on the Add answer button in the toolbar, and enter the answer text and marking options (see above) for the answer. You may attach specific feedback to individual answers, and /or you may set non-specific feedback(i.e. feedback which will be used if no feedback has been attached to an individual answer). Feedback is only relevant when tests are delivered formatively, or when candidates are permitted to see their results at the end of a test. You may include HTML (e.g. images) in either the answers or the feedback by clicking on the html links.
With gap-fill answers, you basically list the answers you would accept for this question. However ExamOnline provides powerful marking options that make marking considerably more robust (i.e. both accurate and flexible) than would otherwise be the case.
Marking Options for Gap-fill Questions
For ExamOnline gap-fill questions, you can specify that candidate answers should have any mis-spellings corrected before marking. You can also control whether the words in the answer(s) you specify should be accepted in any order, or just in the order you have specified. You can specify unacceptable answers, which invalidate otherwise correct answers. You can use regular expressions to specify complex marking rules. And you can specify that answers where a candidate gets a mark for each matching word.
For each answer you must specify the marks to be awarded when a candidate response matches it. Note that the system will apply the answers in the order you list them, and will stop marking when an answer is matched (except where there are unacceptable answers listed, which will always be checked). You should therefore specify the highest mark answers first.
Examples of how to use the marking options for gap-fill questions are shown below.
Example 1
How to set up a question to give 2 marks for answers exactly equal to ‘partial differentiation’, but 1 mark for answers that only mention ‘differentiation’ :

Note that in this example, candidate answers will be spell checked before marking occurs.
Example 2
How to set up a question to give 2 marks for ‘right atrium’, 1 for just ‘atrium’, but no marks for ‘left atrium’ :

Note that in this example, the RA answer is case sensitive, i.e. ra is not an acceptable answer.
You may preview and test your question by clicking on the Preview Question tab (next to the Edit Questiontab near the top left of the screen). If there are errors in the way you have created the answers, you will receive an error message. For example :

If this happens, click the Edit Question tab, return to the Answers tab, correct the error, and then click on thePreview Question tab again. You may test that the question performs as you intended by entering an answer, and clicking on the Test button when in the Preview Question tab.
When you have finished the question, click on the Save Changes button at the bottom of the page. You may start on a new question by clicking the New Question button, or return to the question banks by clicking on theDone button.
Creating a Matching Question
The screenshot below showing a simple matching question which illustrates the terminology (labels andanswers) for matching questions.
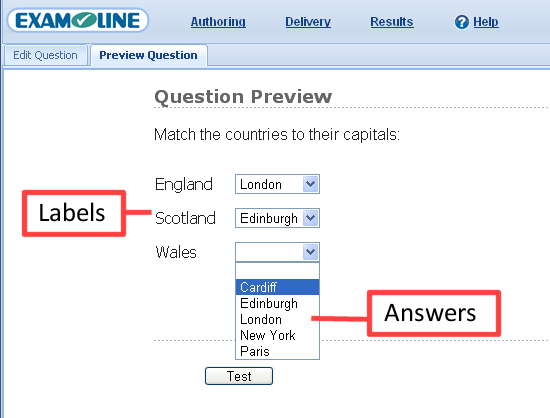
In the example, the labels are England, Scotland, and Wales. For each label there are a number of possibleanswers which the candidate can select from. There can be fewer answers than labels, or the same number, or more.
When you select the matching question type, a Labels and answers tab will automatically be added to the question editor interface.
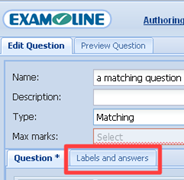
Click on the Labels and answers tab to create the labels and possible answers for the question.
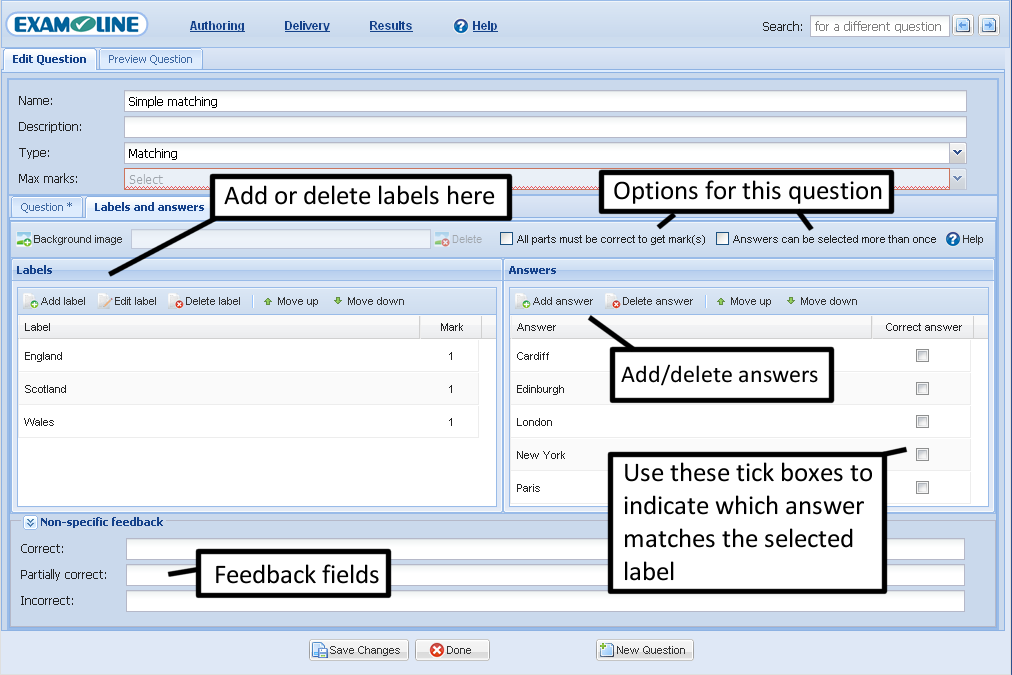
In general, the process to create a matching question is to add in the labels, add in the list of potential answers, specify which is the correct answer for each label, and set any options for the question. These steps are explained below.
The first step will usually be to add the labels for the question (England, Scotland and Wales in the example above). Click on the Add label button in the toolbar, and enter the text for the label (hit the tab key to move on to the next field). You may also enter a number of marks for each label. This is the number of marks that a candidate will get if they select the correct answer for this label. In the example above all labels have 1 mark specified, which means that this will be a 3 mark question (3 labels, 1 mark per label). Using this configuration, if the candidate gets the correct answer for one label, they will get one mark, two marks if they get the answer correct for two labels, etc. As you are setting marks for each label, there is no need to (and the interface does not allow you to) enter a Max marks value for the question – the value will be calculated automatically from the marks set for each label.
An alternative version of the above question would be one that required the candidate to get the answer correct for all labels in order to get any marks. Using the above example, you might want to configure the question so that candidates had to get the correct capital city for England, Scotland and Wales in order to get one mark. To achieve this, click on the “All parts must be correct to get mark(s)” checkbox in the toolbar. You will then be able to set a value for Max marks. For example, if you set Max marks to 1, then the candidate must get all 3 parts correct to get a single mark.
Once you have entered all the labels, you enter the list of potential answers in the right hand table using the Add answer button (again, hit the tab key to move on to the next field).
Once you have entered the list of answers, the next step is to indicate which is the correct answer for each label. To do this, follow these steps:
- Select a label in the table of labels (by clicking on it), then
- Click the checkbox in the table of answers to indicate which is the correct answer for this label.
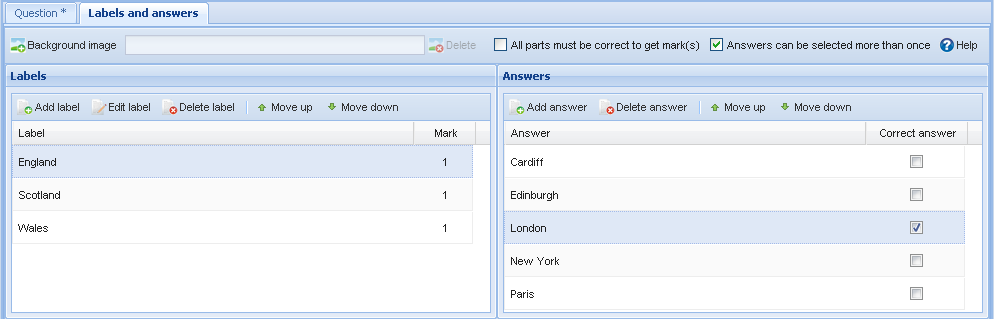
For example, the screenshot below shows the label “England” selected in the table of labels, and that the answer”London” has been selected as the correct answer for this label.
Repeat this process to set the correct answer for each label.
Variations on matching questions
There are a number of variations on the simple matching question illustrated above.
You may choose whether or not candidates are allowed to choose the same answer for each label or not by selecting/de-selecting the “Answers can be selected more than once” checkbox on the toolbar. Generally speaking, you will usually leave this option unchecked, as otherwise candidates may simply choose the same answer for each label in the hope of getting at least one right. However for some questions you may wish to allow the same answer to be selected for more than one label.
You may also add a background image to the question. This allows you to position the labels at a suitable position on the image. An example is shown below.
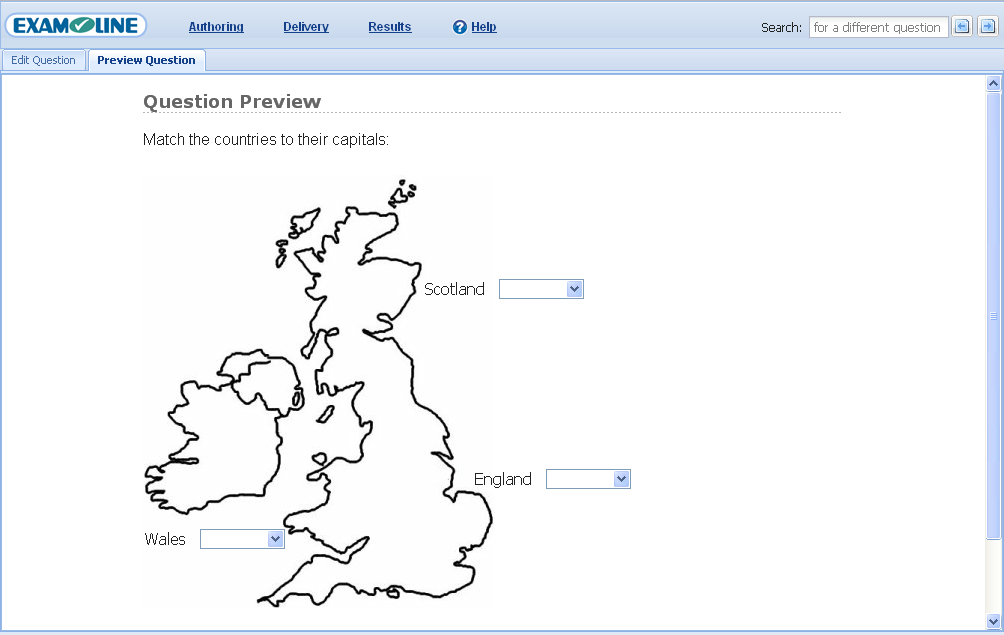
Click on the Background image button in the toolbar on the Labels and answers tab to select the image to use as background to the question. Once an image has been added to a matching question, two extra fields are added to the tables of labels : Image X and Image Y for each label. These allow you to specify the x and y position of the label on the background image. Click on the preview tab to see how your question will be rendered to candidates. You will most likely need to switch back and forward between the preview tab and the Labels and answers tab until you are happy with the position of the labels on the background image.
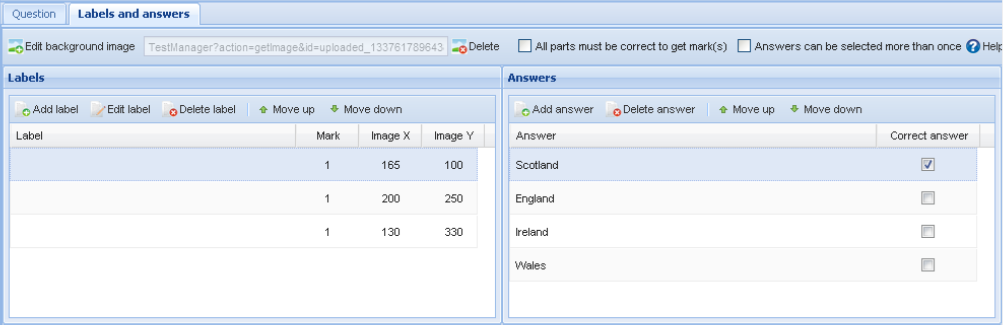
For some questions you may also wish to leave each label blank but position them at an appropriate position on a background image. An example is shown below.
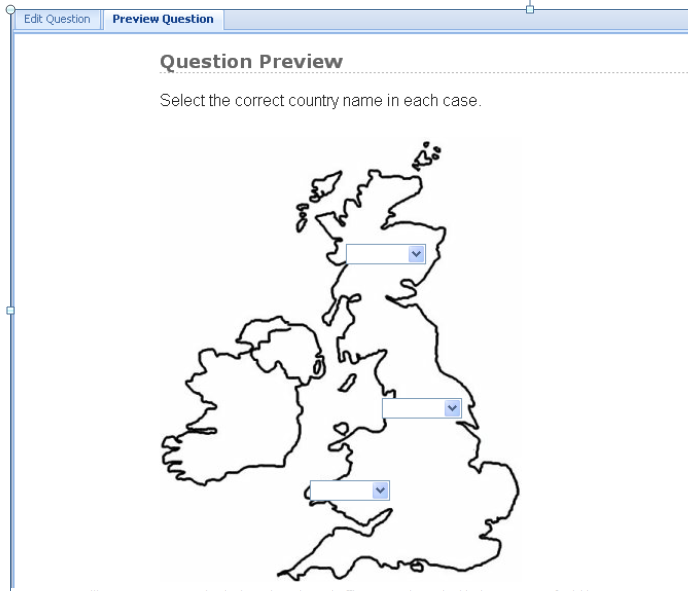
In this case the labels have been positioned over the countries, but no label text has been entered. Note however that you still need to create the labels, but you simply leav them blank. The Labels and answers tab for the example shown above looks like this:
Creating a Ranking Question
The process for creating a ranking question is the same as for creating a matching question, except that instead of answers for labels you specify a list of possible rankings for each possible choice. Typically ranks will be simple numbers, as shown in the example below.
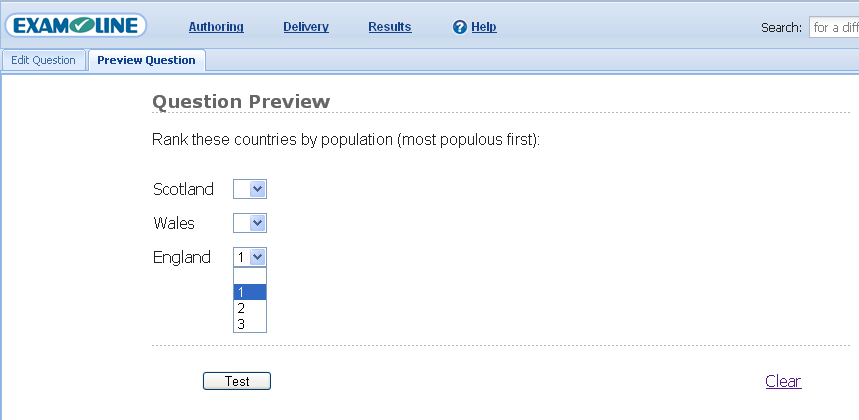
In this example the choices are Scotland, Wales and England and the possible rankings for each choice are 1, 2, or 3. The Choices and rankings tab for this example is shown below.
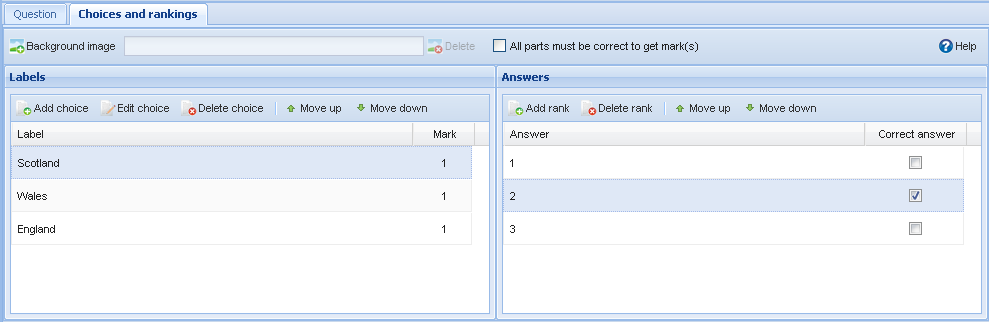
Note that candidates can never select the same ranking more than once for ranking questions – i.e. they must choose a unqiue ranking for each choice.
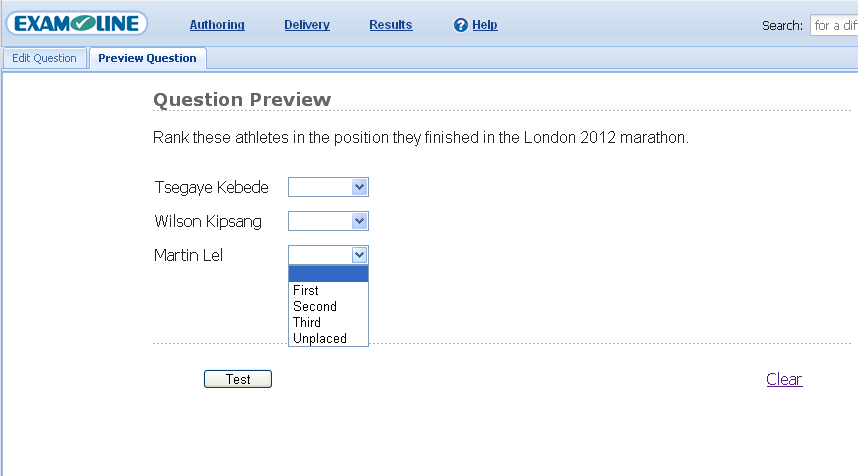
You can in fact enter any text you wish for rankings, as shown in the example below.
The answers and labels tab for this example is shown below.
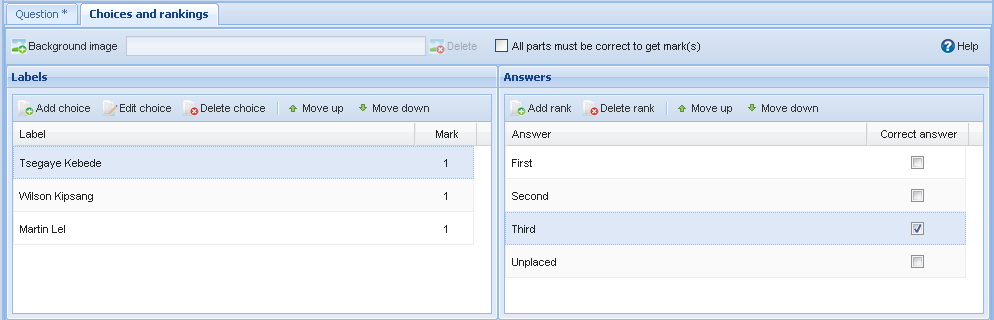
As with matching questions, you can set up the question such that the candidate gets one or more marks for each correct ranking, or you can set up the question to require the candidate to get the rankings correct for allchoices in order to get any marks. To achieve the latter, click on the “All parts must be correct to get mark(s)” checkbox in the toolbar. You will then be able to set a value for Max marks. For example, if you set Max marks to 1, then the candidate must get all parts correct to get a single mark.
Creating an Essay / Extended Answer Question
This question type cannot be marked automatically, it requires human marking. See also the documentation for the Human Marking Interface.
ExamOnline has unique support for essay type questions. Candidates enter their essay using an intuitive and familiar word processor interface, which supports formatting and cut and paste. Candidate answers are automatically saved every 20 seconds or so. The system is tolerant to network and server failures, automatically resynchronising when the network / server are restored, without the candidate being aware of any problem. And ExamOnline includes an efficient human marking interface, allowing markers to annotate candidate answers with comments / feedback, and providing significant efficiency savings over paper based marking. Alternately, candidate essays can be printed out for marking on paper.
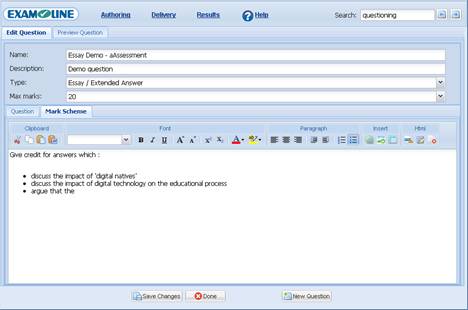
When you select the Essay / Extended Answer question type, a Mark Scheme tab will automatically be added to the question editor interface.
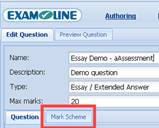
The mark scheme tab can be used to enter the marking guidelines (sometimes called the rubric) which markers should apply when marking answers to this question. Click on the Mark Scheme tab to enter the text and / or images for the marking guidelines.
Creating a Test Document
In traditional paper-based assessment, candidates are presented with a test paper which contains the questions to be answered and any associated instructions. In ExamOnline, the term test document is used, but the concept is the same.
Test documents are created using an HTML editor, with questions being imported from one or more of the question banks you have created.
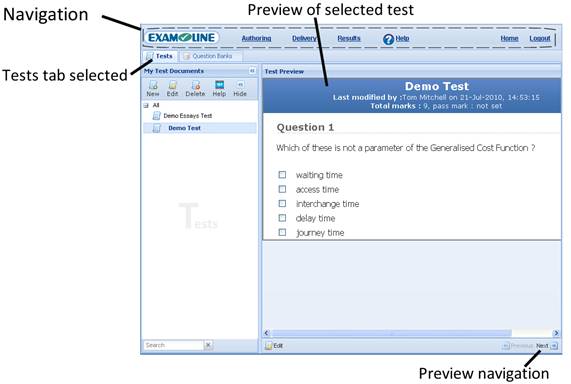
To create a test document, open the Authoring App, and make sure the Tests tab is selected, as shown below.
Click on the New button in the test tab, and the Test Editor interface opens, as shown below.
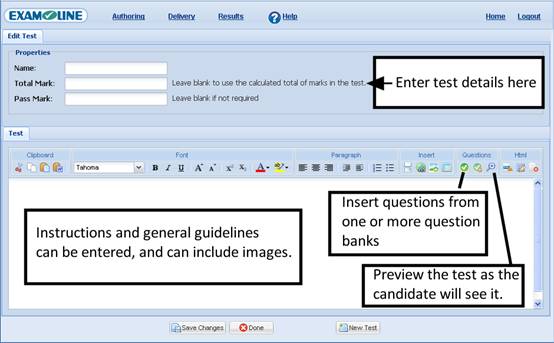
You must enter a name for your test. The system automatically calculates the number of marks available for the test from the questions you have included in the test (see below). If, however, some of the questions in the test are optional (i.e. answer any 3 from 5), then the calculated total will be wrong. In this instance you can override the calculated total marks by entering the correct value in the ‘Total marks’ text box.
Examples of creating and previewing test are shown below.
A Simple Test – Questions Only
The simplest test document contains only questions. To import questions from a question bank into a test document, click on the ![]() Insert Questions button on the HTML editor toolbar. A new window will open, as shown below.
Insert Questions button on the HTML editor toolbar. A new window will open, as shown below.
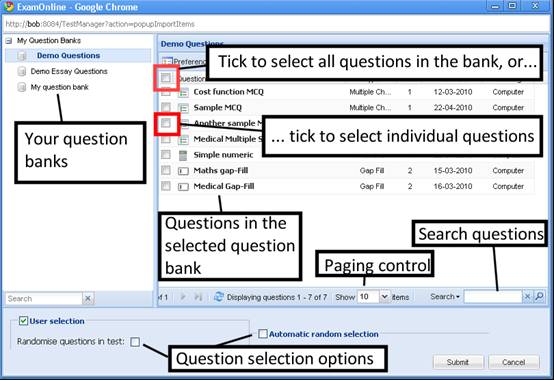
Select the question bank you want to use. You now need to select the questions. This can be either by :
- User selection – you choose the questions (either individually or by selecting all in the bank). In this case, all candidates get the same questions.
- Automatic random selection – you specify how many questions to select, and the system selects them automatically from the question bank when the test is delivered. In this case, candidates may get different questions.
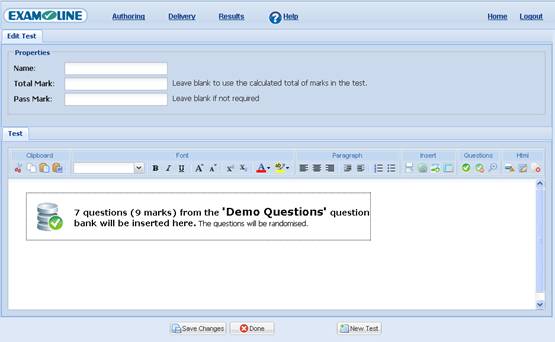
Once you have made your selection, click on the Submit button, and a placeholder for the questions will be inserted into the test document, as shown below.
Previewing a Test
To see the test as the candidate will see it, click on the ![]() Preview Test button in the HTML editor toolbar, but note you must have saved the test document before you can preview it.
Preview Test button in the HTML editor toolbar, but note you must have saved the test document before you can preview it.
The test preview is shown in a new window :
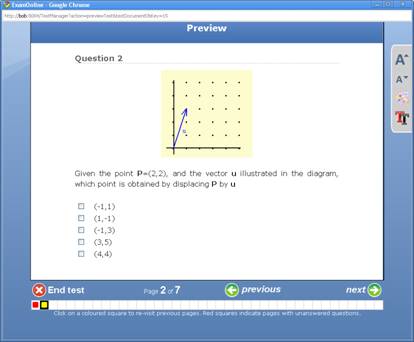
You can click on the Next and Previous buttons to navigate through the questions in the test, and you can preview how the test will look with different accessibility settings (click on the icons on the panel on the right hand side of the screen). See the section on The Candidate Interface for a more complete description of the test interface.
A Test With Candidate Instructions
You may use the formatting capabilities of the HTML editor in the test editor to include and format instructions in your online test, just as you might for a paper-based test. The example below shows a test being edited which has a page of instructions (including an image) inserted before the questions. The grey box is actually a table (with no border) which is being used to format the position of the text. Note that a page break has been inserted after the instructions. This is done using the ![]() Page Break button on the HTML editor toolbar.
Page Break button on the HTML editor toolbar.
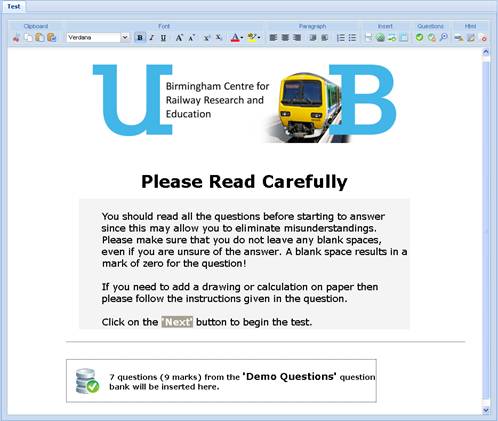
When this test is previewed, the first page shown is :
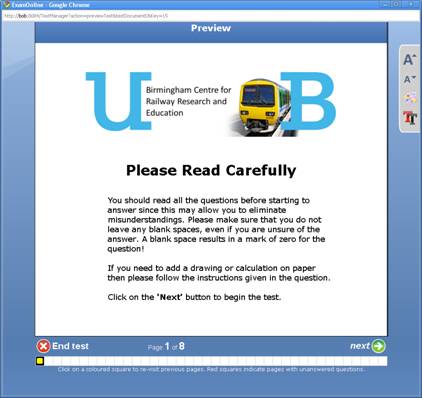
Tests With Sections
You can split your test into different sections. There are two main reasons you may wish to do this:
- To organise your test into topics areas, and provide a navigational aid to candidates to jump quickly between these topic areas;
- To randomise questions across a number of different question banks.
To add a section to a test, click on the ![]() Sections button on the HTML editor toolbar. A section marker will be inserted into the test as shown below.
Sections button on the HTML editor toolbar. A section marker will be inserted into the test as shown below.

To set the properties for a section, click on the section marker. The following window will appear.
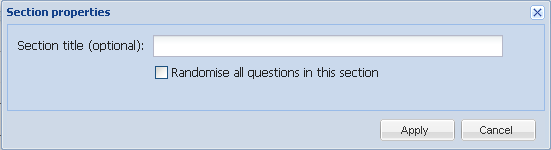
You may optionally set a title for the section (see below), and/or you may choose to randomise all the questions in this section. If you select to randomise the questions, then the questions from all the questions banks in this section (i.e. those that follow the section marker, until the end of the test or another section marker is encountered) will be treated as if they are part of a single question bank, and all randomised together. So in the following example:
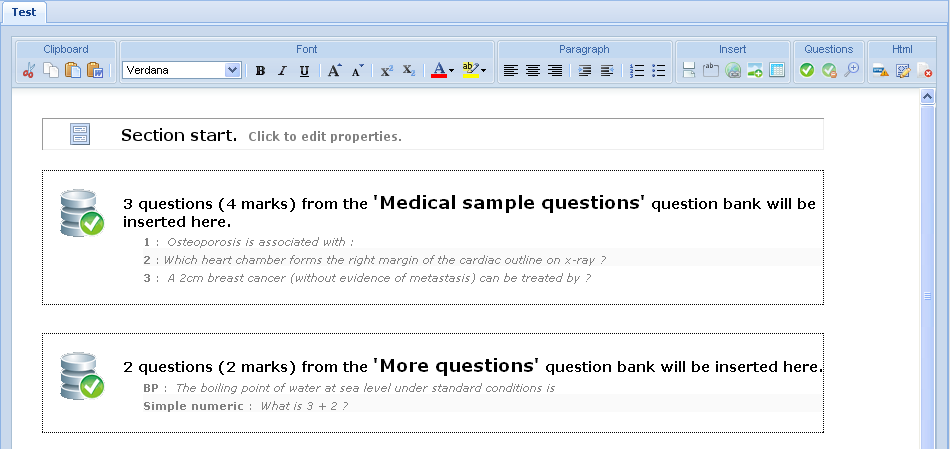
the questions from the “Medical sample questions” question bank and the questions from the “More questions” question bank will all be randomised together, meaning that candidates may get a question from the “More questions” question bank followed by a question from the “Medical sample questions” question bank, followed by another question from the “More questions” question bank, etc. Note that there is no need to specify random selection when selecting the questions from the question bank, the fact that you have selected randomise for the section ensures that the questions will be randomised.
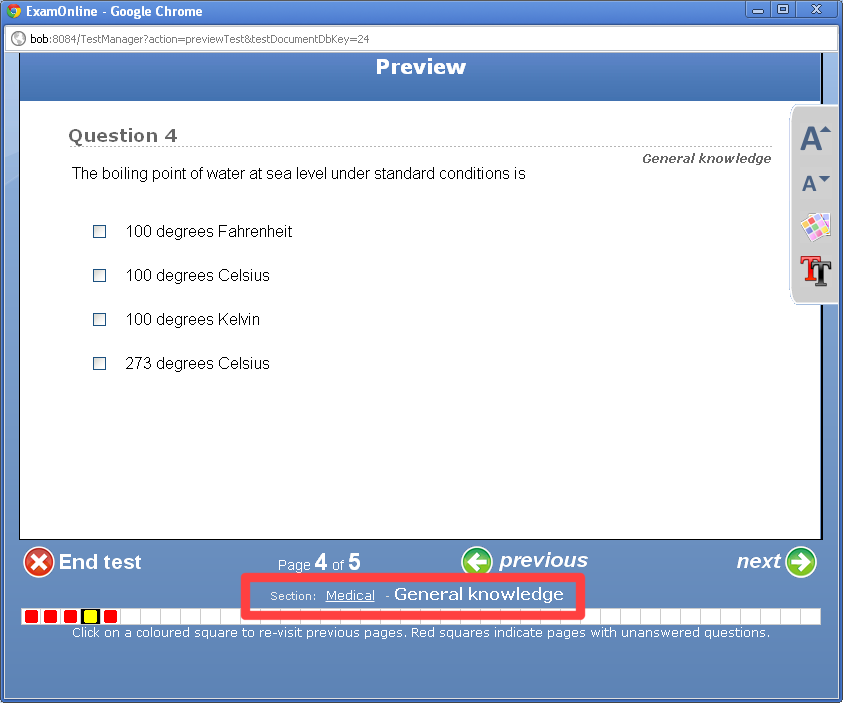
The second reason you may wish to add sections to your test is to organise it by topic or some other characteristic. In this case if you add titles to your sections then an additional navigation aid is shown to candidates. Looking at the following example, there are two sections, the first has been given a title “Medical” and the second “General knowledge”.
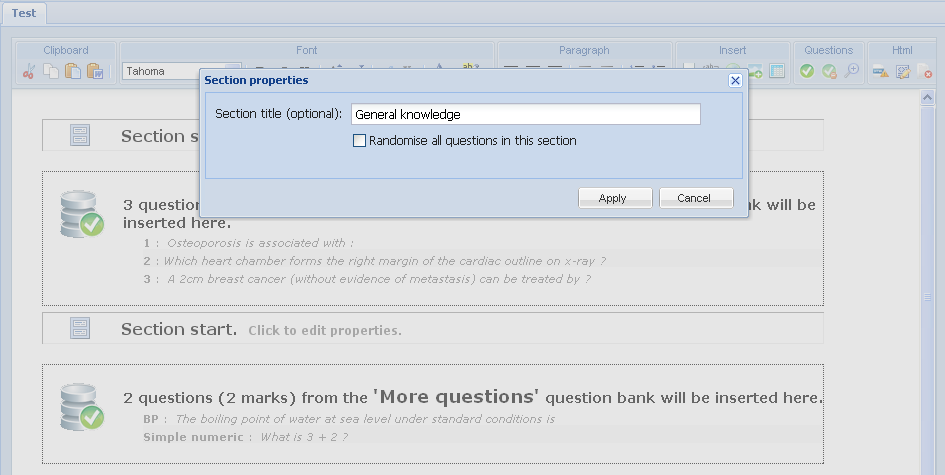
When the test is delivered to candidates, the titles of the section are shown at the bottom of the page (highlighted with a red box in the screenshot below), and are hyperlinked, so that a candidate can jump between sections by clicking on the section name. Note however that candidates cannot jump forward to a section until they have viewed all the questions in preceding sections (by clicking on the Next button as normal).
When you are happy with your test, you are ready to deliver it. For this you use the delivery app.