There are two ways to deliver a test in ExamOnline : you can schedule a test for delivery, or you can run an invigilated test immediately. As the name suggests, scheduling a test means specifying a future time window when the test will be available to a particular group of candidates. This is the conventional way to deliver e-assessments.
However ExamOnline also supports a unique model to support immediate delivery of a test where a supervised group of candidates are assembled in one place (i.e. the test is invigilated, or proctored). This is referred to as running an invigilated test.
Examples of delivering both types are shown below.
Scheduling a Test for Delivery
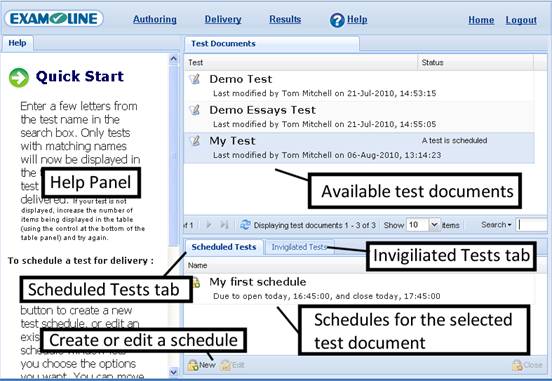
The Scheduled Tests tab allows you to schedule a test for delivery, or edit an existing schedule. Begin by selecting the test document you want to deliver, and then click the New button at the bottom of the screen. TheTest Schedule Window pops up, as shown below.
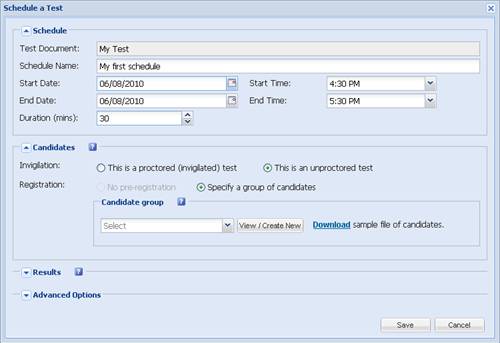
The window is split into 4 sections :
- Schedule: this is where you set the time period the test will be available for, and the duration of the test;
- Candidates: This is where you specify which candidates can take the test;
- Results: This is where you indicate whether candidates should be shown their results or not at the end of the test;
- Advanced Options: additional settings, such as whether or not to show a page of instructions before the test begins, and whether candidates can log back in once they have logged out.
You can move your mouse over the ![]() help icon for detailed help when setting the options. See also the section below on how to select / upload candidate groups.
help icon for detailed help when setting the options. See also the section below on how to select / upload candidate groups.
Selecting and Uploading Candidate Groups for Scheduled Tests
When you schedule a test for delivery, you must specify the group of candidates who can access the test. Initially of course, you will not have added this information to the system, so below we will walk through the process.
Candidate details are added to ExamOnline in groups, and each group must be uploaded as a separate csv file in the format shown below.
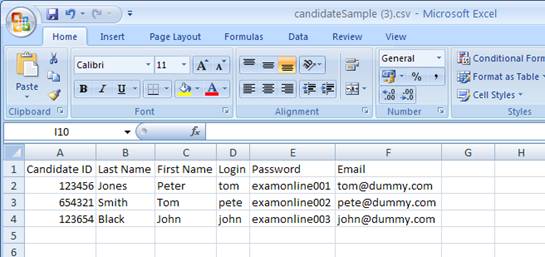
Note that you can download the file shown above and use it as a template for your own uploads by clicking on the Download sample file of candidates link in the Test Schedule Window (accessed from the Delivery App), as shown below.

So the first step is to download this file, and populate it with your own data. Then, from the Test Schedule Window popup, click on the button which says View / Create New in the candidate group section (see image above). The Candidate Group Window pops up, as shown below, and is initially empty (i.e. contains no candidate groups).
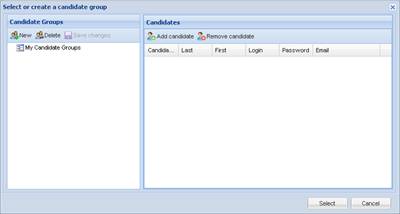
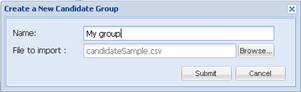
To add your group, click on the New button on the toolbar, and in the dialog which appears, give your group a name and click on the Browse button to navigate to the csv file you have created.
If the file you upload does not match the required format, you will see an error message and the upload will fail. In this case check the file you are uploading and compare the format to that shown previously in this section.
Once your upload has been successful, your new group will be added to the list on the left, and you will see the candidate details for the group in the right hand panel, as shown below.
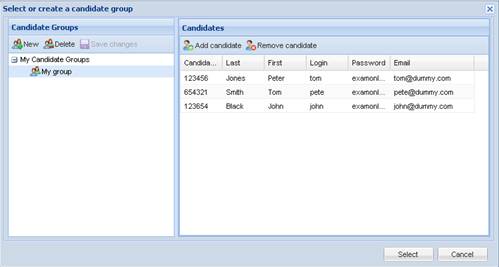
This group will now stay in the system (until deleted) and can be used when scheduling tests.
Delivering an Invigilated Test Immediately
ExamOnline is unique in offering a different way to deliver an e-assessment, one that is very useful when you have all the candidates together in one location and are ready to start a test.
The approach is based on the well-known model of an invigilated examination, with the invigilator in the same room as the candidates sitting the examination. The invigilator logs in to ExamOnline using a PC in the exam room itself, and accesses the Delivery App to select the examination paper. The next step is click on the Invigilated Test tab, as shown below.

The process to follow to start an invigilated test is simple, but secure. The process is illustrated and described below.
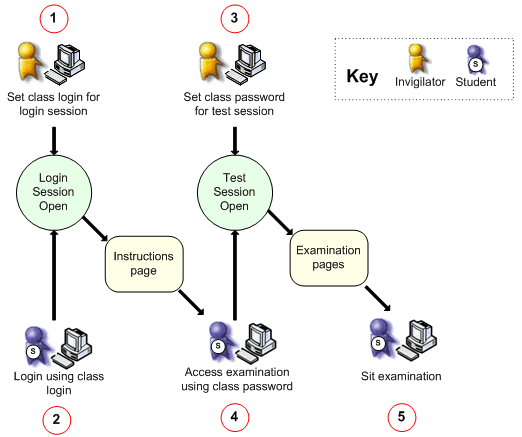
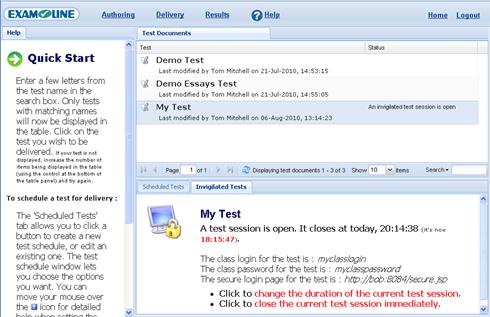
Step (1) : The invigilator open a login session, and specifies a class login.
Step (2) : The class login is communicated to the candidates. The candidates are then able to login to the system and to proceed as far as a holding page, which gives instructions on the test.
Step (3) : When ready, the invigilator will open the test session proper, specifying the duration of the session and, at the same time, specifying a class password.
Step (4) : The class password is communicated to the candidates, they enter this and are able to access the test.
Note that :
- There is no need to upload a candidate group before running an invigilated test. Rather, the system simply creates a unique test session for each candidate who logs in to take the test. As with a normal examination, verification of candidate identity (e.g., by means of a matriculation card) is the duty of the invigilator;
- Candidates leaving the examination room and subsequently trying to re-login to the test will not be able to access their test – a second level administration password is required for re-logins.
The screenshot below shows the invigilator’s view of an open test session. The screen displays the login details that the candidates need to access the examination and enables the invigilator to change the duration of the session, if required.